f The Bugbytes

Welcome - Copyright & Disclaimer

We are moving from custom domain back to blogspot. If there are broken links please try adding blogspot.com instead of .com. Welcome to The Bug Bytes - a blog mainly for Papercrafting and some photography and other stuff thrown in here & there. Add in some die cutting machine, scrapbooking tools, cameras, scissors , glue and...... My name is Pam. If you have been redirected from papillondigitaldesign.blogspot.com you have come to the right place.Hope you get inspired by the projects, videos and files. Would love it if you could leave comments and become a follower. (Word verification is turned ON to avoid spam. Sorry for that inconvenience.) Would love it if you would also share your project here . If you find a linky under the post do share your project by posting link there or if you do not find a linky post your link in the comments.Thank you for visiting.

November 6, 2012

Yeah! what a great weekend!

Had a wonderful weekend at the  Copic certification class. Our instructor was Colleen Schaan.  What a sweet sweet person. Loved her instructions. Her joy in the art came through. And got her autograph on my copy of her books :)
What a great and interesting bunch of colleagues ! We had a fun time! Hopefully a lot of us will keep in touch.


post signature

Happy Birthday Pam


Happy Birthday to a Sweet - Sweet Lady!

HAPPY BIRTHDAY PAM


Just a quick little note from all of us to say HAPPY BIRTHDAY to a Sweet - Sweet Lady!

My Portland Maine Pages

Hi, Sheila here from She's A Sassy Lady and I am so excited to share these pages with you. Thank you Pam for letting me spend a little time with you and your followers. Recentyly Hubby and I went on a wonderful trip to Portland, Maine and we had the best time. It was a company sponsored trip yet I was able to tag along and we had 3 days of free time! It was great and we celebrated our 42nd wedding anniversary while we were there!
As you know things have been very hectic in my life as of late and I just want to thank you for all the wonderful letters, notes and prayers in our behalf. I am thankful for each and everyone of you. I also want to thank each and everyone of the Sassy Designers for being there and always sharing a wonderful post with you... they are THE BEST!


For this post I used the Close To My Heart Studio J digital page program and this time made a video showing you how easy it is to design the pages no matter which option you choose from the site. My video will show both options. Either way it will take you around 15 minutes to make 2 pages. And with my hectic life as of late this is a wonderful option.
This is the 2nd page. My handsome hubby and I did a lot of walking and check out the sites... so many special memories captured and saved to cherish. I just love the size of the photos in these shots. And I like that I can fit a lot or as little photos as I want using this program. Just pick and choose for your particular needs.
Here is what the pages look like completed. All I need to do is purchase and print and Close To My Heart ships my pages right to my house. I always purchase the Studio J 5 pack as it is only $39.95 which breaks out to $4 per 12x12 page and I love that.
I sure hope you liked my pages today. It was so nice to spend a little time with you. Thanks for joining me today and tank you for your sweet sweet words of encouragement. Your comments continue to inspire me. Have a blessed day!

November 5, 2012

Concertina fold card

Good Morning!

This is Jen from 3 cats and a bug!  I'm excited to be here at the BugBytes again this month.  I will admit, it's getting harder and harder to come up with projects, Pam's DT is so talented I can't keep up with them!  So, for my project, I decided to do a concertina fold card that I found over at Splitcoaststampers, (here) by Cherie Franklin.

I started out with 2 pieces of 5.5 x 8.5 of cream colored card stock and 1 4.25 x 5.5 brown card.  You can make these with just a card base (that doesn't open), but I prefer my cards to open.


On both pieces of cream paper, I scored them at 2 1/8, 4 1/4 and 6 3/8.

From the 1st score line I lined up to the 2 inch mark and cut.
Next I folded each piece accordion style.
I attached each accordion piece to the front of my card using my pink atg gun.

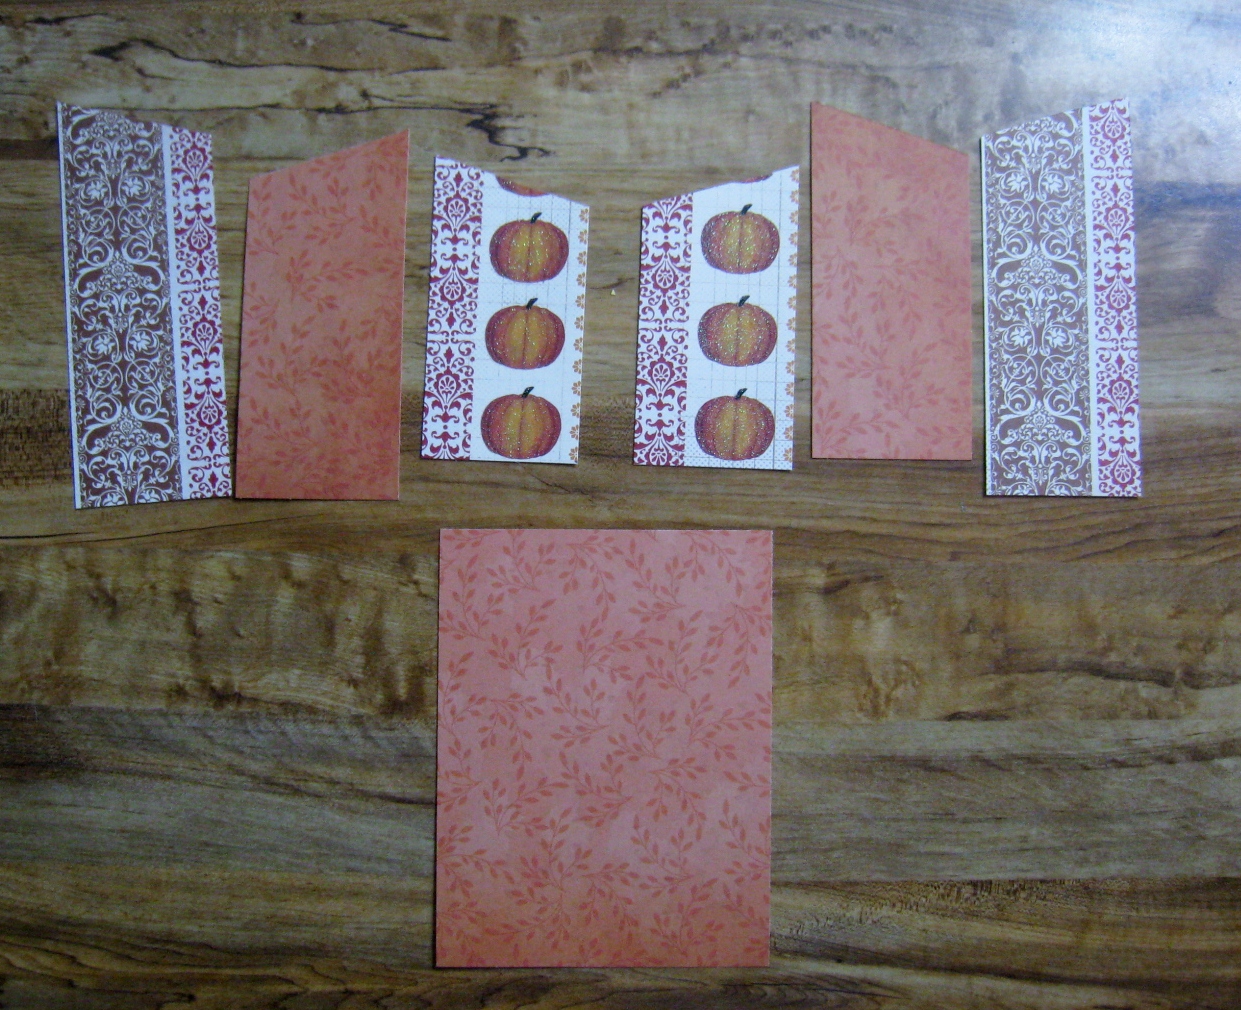
Next I cut all the patterned paper, cutting it just a hair smaller than what I needed, again, that's just what I prefer.  The large piece is shy of 4.25 x 5.5.  The other pieces are 2 inches wide, I used a pencil to mark where to cut them.

 I glued everything down with my atg gun.
 
I used my spellbinders and cut a scalloped oval to hold the two pieced closed and added some left over stickers to decorate.
For the inside of my card I added patterned paper, leaving a large enough space so I can add my Thanksgiving verse later on.
Sassy gave her seal of approval on the finished card, but she didn't like the mess left over on my (her!) table.

Be sure to stop over a splitcoast stampers for a much better tutorial!  :)

November 4, 2012

Classic guys never go out of style


Hello again my blogging friends!  This is MelodyR from A Splash Here and There blog.  Thanks Pam and her readers for having me over here once again.  I'm sharing a card I created for my dad's 75th birthday.  The card is roughly 5x7 and all cuts were done using the Cameo.  All paper patterns used were also from the Silhouette Store. 

The base of this shaped card was achieved by overlapping the antique vintage car image by Jamie Koay and the banner frame by Sophie Gallo via the offset feature on the Silhouette Studio, as seen below.


After creating the outer shadow for both images, I made another copy of the shadow, flipped it vertically and then welded the two shadows to create the base of my card.


I used the print and cut feature of the Silhouette Studio to fill in the patterned paper for the vintage car and the banner frame.  I've also included a sentiment on the banner frame using Arial font.  For the inside of the card, I used the Baroque Script font. 


All the cuts using the Cameo came out really nice!  I printed and cut a total of three of the vintage car to layer for depth. 


And here's a shot of the inside of the card.  A little faux stitching here and there, some irock white gems and a bit of foam mounts and I'm done. 


Thanks for looking and have a wonderful day! 

November 3, 2012

Birthday Wishes! 5 years and more!

Hello Everyone,

This is Denine with the PumpkinSpice Blog. Thank you so much Pam for having me on TheBugBytes.  Pam has such an amazing group of ladies contributing to her Design Team.  I am always in 'ahhhh'.  If you are not already following TheBugBytes, you need to be! :)

WARNING: Lots of Pictures on this post.

I have had so much fun these past couple of weeks participating in a few card/tag exchanges.  Here are some pictures of a couple, I always forget to take pictures.


Here is a card I made with the Traditions papers.  I just love this line of paper.


I am not allowed to share pictures of the tags yet, hehe.

Big hugs and Thank you to Pam and Sheila for organizing the tag exchange.  I had sooooo much fun going outside of my typical craft and putting together these sweet tags.  It really got me in the mood to craft for the holidays.

Here at PumpkinSpice we have been crafting our little fingers to the bone. 

Pumpkin is turning 5 this week and we made some adorable invitations for her party.

We made about 25 of these little Castles. 


Using:
Bazzill Cardstock Bling Tiara
Bazzill Cardstock Smoothie Caribbean Breeze
Beacon Glue & Adhesive 3 In 1
Inkssentials™ Glossy Accents
and a cut file from SilhouetteOnlineStore - Design #9356 Castle Card

Here is a picture of her table and some large medallions.

 
The center piece if for cupcakes and I make a ribbon wreath around the stand.  I got the idea after making the Deco Mesh wreath for Halloween.  If any of you know about the Costco ribbons, I love them, but never have a need for 50 yards.  Well GUESS WHAT??  This used up several yards and I just love how it turned out. 

Used:
About 20 yards each of 2 wire edged ribbons from Costco and 2 rolls of tulle.  Probably about $18 in materials. 

I hope all is well in your families with all the stormy weathers and natural disasters we are having.

Washington is becoming a big puddle, that time of year.

Enjoy!!  I hope you found some inspiration today!

Hugs,


November 2, 2012

Treats ! There is always an occasion!

Hello
 This is Pam from The Bugbytes  & Papillon Digital Designs your designer today  on She's a Sassylady.
And wonder of wonders no copic colored project today for you. Gasp!!!
I thought I would share with your a simple project I made. This treat bag and card can be used for all occasions. You can just change the pattern paper to suit the occasion.


The treat bag is a pencil pouch from silhouette store.  I resized it to fit a 8 1/2 by 11 paper. When I resized I made sure to ungroup the circles (for the tie/bind) and then regrouped them so that the size of circles does not change as I did not want the punched holes too big or too small.
I used twine to close after adding the candies of course. I decided to bring in a little blue by adding it in the flower and also the small punched flower (ek success). The design is also from silhouette store.


For the card I decided to add some twine too like a border and punched some flowers (ek success) to go between the 2 rows of twine. Too make the Twine border I just ran my ATG scotch tape and cut 3 strips of twine and glued it on. 3 layers of twine fills in the tape beautifully. A center flower finishes the card


For inside of the card more twine and punches and a label cut in silhouette sd


So that's my project for today.
Hope you all enjoyed it. Thanks Sheila for letting us  post in your lovely blog.
Happy Crafting!

post signature

Treats ! There is always an occasion!

Hello
 This is Pam from The Bugbytes  & Papillon Digital Designs your designer today  on She's a Sassylady.
And wonder of wonders no copic colored project today for you. Gasp!!!
I thought I would share with your a simple project I made. This treat bag and card can be used for all occasions. You can just change the pattern paper to suit the occasion.


The treat bag is a pencil pouch from silhouette store.  I resized it to fit a 8 1/2 by 11 paper. When I resized I made sure to ungroup the circles (for the tie/bind) and then regrouped them so that the size of circles does not change as I did not want the punched holes too big or too small.
I used twine to close after adding the candies of course. I decided to bring in a little blue by adding it in the flower and also the small punched flower (ek success). The design is also from silhouette store.


For the card I decided to add some twine too like a border and punched some flowers (ek success) to go between the 2 rows of twine. Too make the Twine border I just ran my ATG scotch tape and cut 3 strips of twine and glued it on. 3 layers of twine fills in the tape beautifully. A center flower finishes the card


For inside of the card more twine and punches and a label cut in silhouette sd


So that's my project for today.
Hope you all enjoyed it. Thanks Sheila for letting us  post in your lovely blog.
Happy Crafting!

post signature

November 1, 2012

Monochromatic Boy Card

Hi everyone! This is Elizabeth from 217 Creations. I enjoy the challenge of monochromatic.  It is hard to make the same color different in each layer. I hope this card inspires you to try this style of crafting with a tips and tricks.
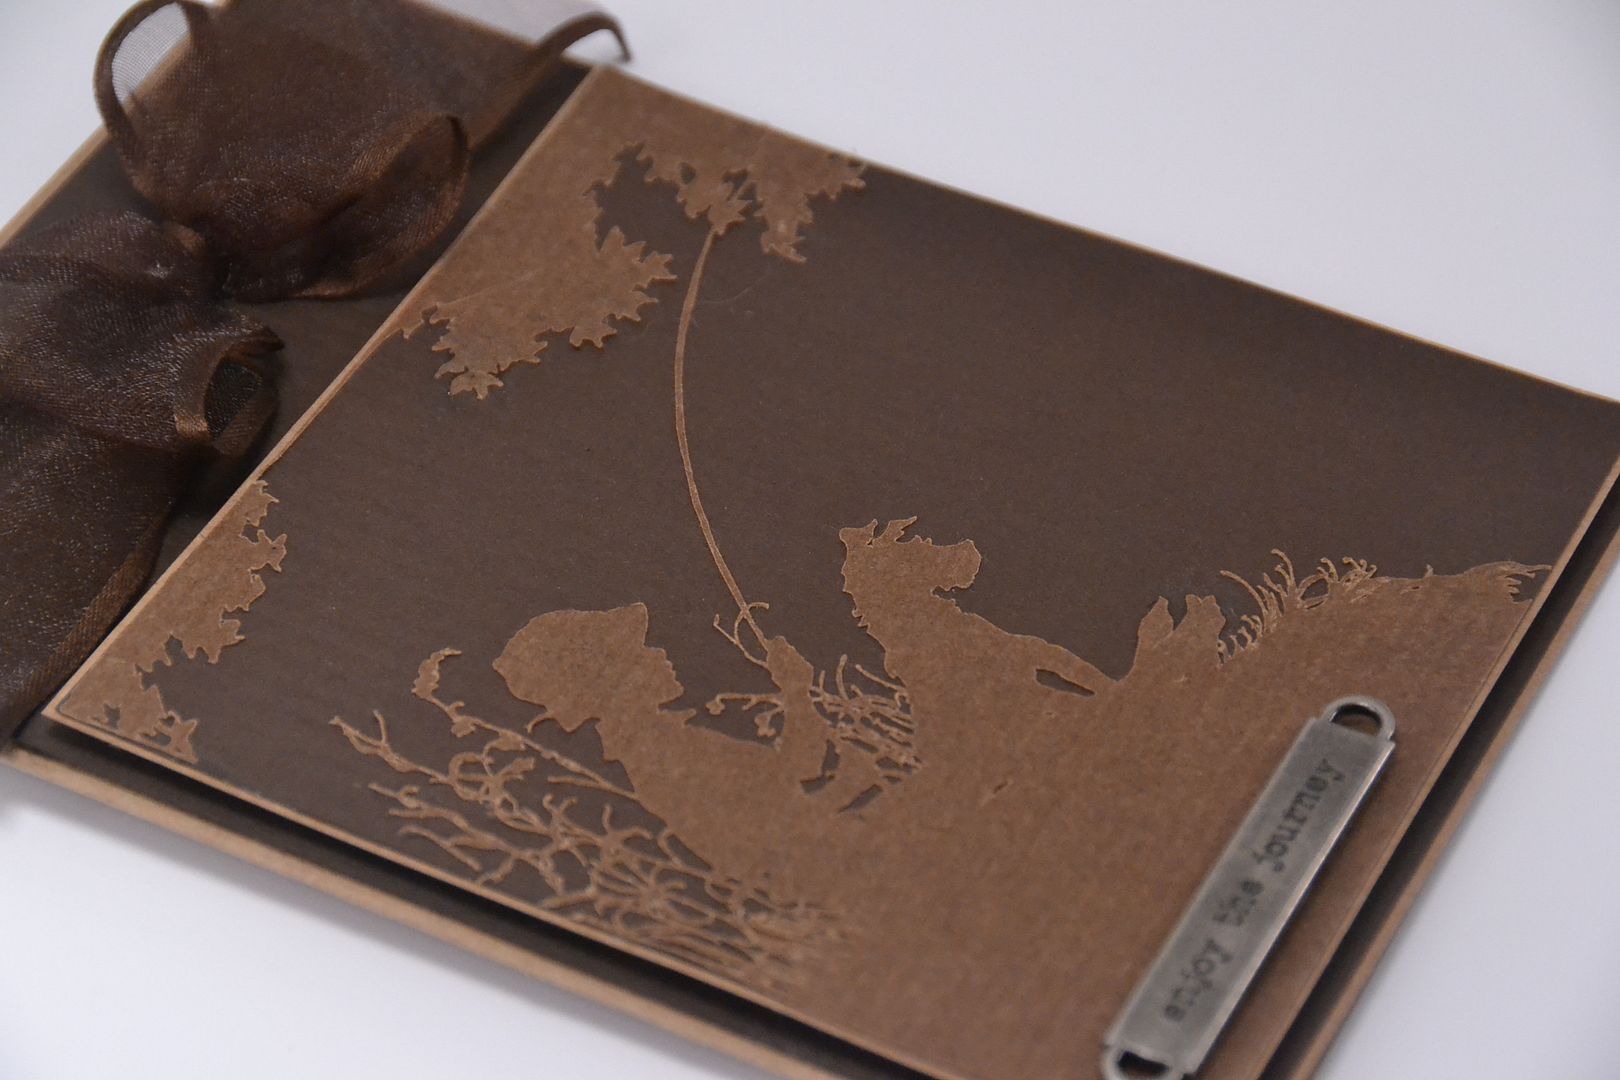
As much I love my Cricut, my cameo is now my go to machine if I need to cut something intricate. I saw this image in the Silhouette store.  It is from Hero Arts.  After cutting this image, I went bought more of their silhouettes.  They are so timeless!  This image was cut using the pre-set setting in the Silhouette software of  patterned paper 65lbs. for the Tim Holtz Glassine Paper. It as cut at 4.75 by 5.80 inches.
I think the main trick to doing a monochromatic project is to vary the textures. In this case I use Tim Holtz Glassine paper for the image and some of the mounting.  Another tip to doing monochromatic is to use pop dots or dimensionals.  These will help also in separating your layers.
Have a creative day and thank you for taking the time to comment and subscribe not only here at the Bug Bytes but also on my personal blog at 217 Creations.