f The Bugbytes

Welcome - Copyright & Disclaimer

We are moving from custom domain back to blogspot. If there are broken links please try adding blogspot.com instead of .com. Welcome to The Bug Bytes - a blog mainly for Papercrafting and some photography and other stuff thrown in here & there. Add in some die cutting machine, scrapbooking tools, cameras, scissors , glue and...... My name is Pam. If you have been redirected from papillondigitaldesign.blogspot.com you have come to the right place.Hope you get inspired by the projects, videos and files. Would love it if you could leave comments and become a follower. (Word verification is turned ON to avoid spam. Sorry for that inconvenience.) Would love it if you would also share your project here . If you find a linky under the post do share your project by posting link there or if you do not find a linky post your link in the comments.Thank you for visiting.

December 7, 2012

Rudolph the Red nosed reindeer!

Hello This is Pam from Papillon Digital Designs & The BugBytes today on Shes a Sassylady.
Thank you Sheila for having us in your design team and allowing us to post in your fun blog!
For today I have a card for you.

This cute digi image is from instyle stamps which came along with lots of images in a cd. Love this reindeer and had to color him. I decided to experiment and get bold with the background and colored the sky pretty dark . Colored with copics of course. The dark sky is using the B6 family ie B60-B69. Then it is feathered to V0 family and finally to YR0. While using copics I generally keep a scrap paper (a piece from the same kind of paper which I color and see how the colors blend and look by scratching in that) Guess the scratch paper practice stuck with me from watercolor days as my instructor used to ask us always to try on that before putting the brush on actual paper.

Well here is the card


The orange paper is really glittery and shiny

I have used Marianna Designables on the coredinations cardstock. Love how I can cut and emboss with it. I think the one I used is DS0907.  Then I rubbed the embossed paper with sandpaper to expose the white core.I have also used EK Success swirl punch on the edge. The reindeer image did not come with a background so I just sketched the snow and tree in.  I added some white snow with opaque white paint. I did add some glitter to the snow but you cant see it quite well in the photo. Some ribbons  and rhinestones to embellish. I punched out a snowflake from a paper to add as a medallion on the white ribbon. A Teressa Collins brad on the bow and a sentiment on the label inside completes the card.
Thank you Sheila once again and thank you readers for reading this post.
 Happy Holidays

post signature

Rudolph the red nosed Reindeer

Hello This is Pam from Papillon Digital Designs & The BugBytes today on Shes a Sassylady.
Thank you Sheila for having us in your design team and allowing us to post in your fun blog!
For today I have a card for you.

This cute digi image is from instyle stamps which came along with lots of images in a cd. Love this reindeer and had to color him. I decided to experiment and get bold with the background and colored the sky pretty dark . Colored with copics of course. The dark sky is using the B6 family ie B60-B69. Then it is feathered to V0 family and finally to YR0. While using copics I generally keep a scrap paper (a piece from the same kind of paper which I color and see how the colors blend and look by scratching in that) Guess the scratch paper practice stuck with me from watercolor days as my instructor used to ask us always to try on that before putting the brush on actual paper.

Well here is the card


The orange paper is really glittery and shiny

I have used Marianna Designables on the coredinations cardstock. Love how I can cut and emboss with it. I think the one I used is DS0907.  Then I rubbed the embossed paper with sandpaper to expose the white core.I have also used EK Success swirl punch on the edge. The reindeer image did not come with a background so I just sketched the snow and tree in.  I added some white snow with opaque white paint. I did add some glitter to the snow but you cant see it quite well in the photo. Some ribbons  and rhinestones to embellish. I punched out a snowflake from a paper to add as a medallion on the white ribbon. A Teressa Collins brad on the bow and a sentiment on the label inside completes the card.
Thank you Sheila once again and thank you readers for reading this post.
 Happy Holidays

post signature

December 6, 2012

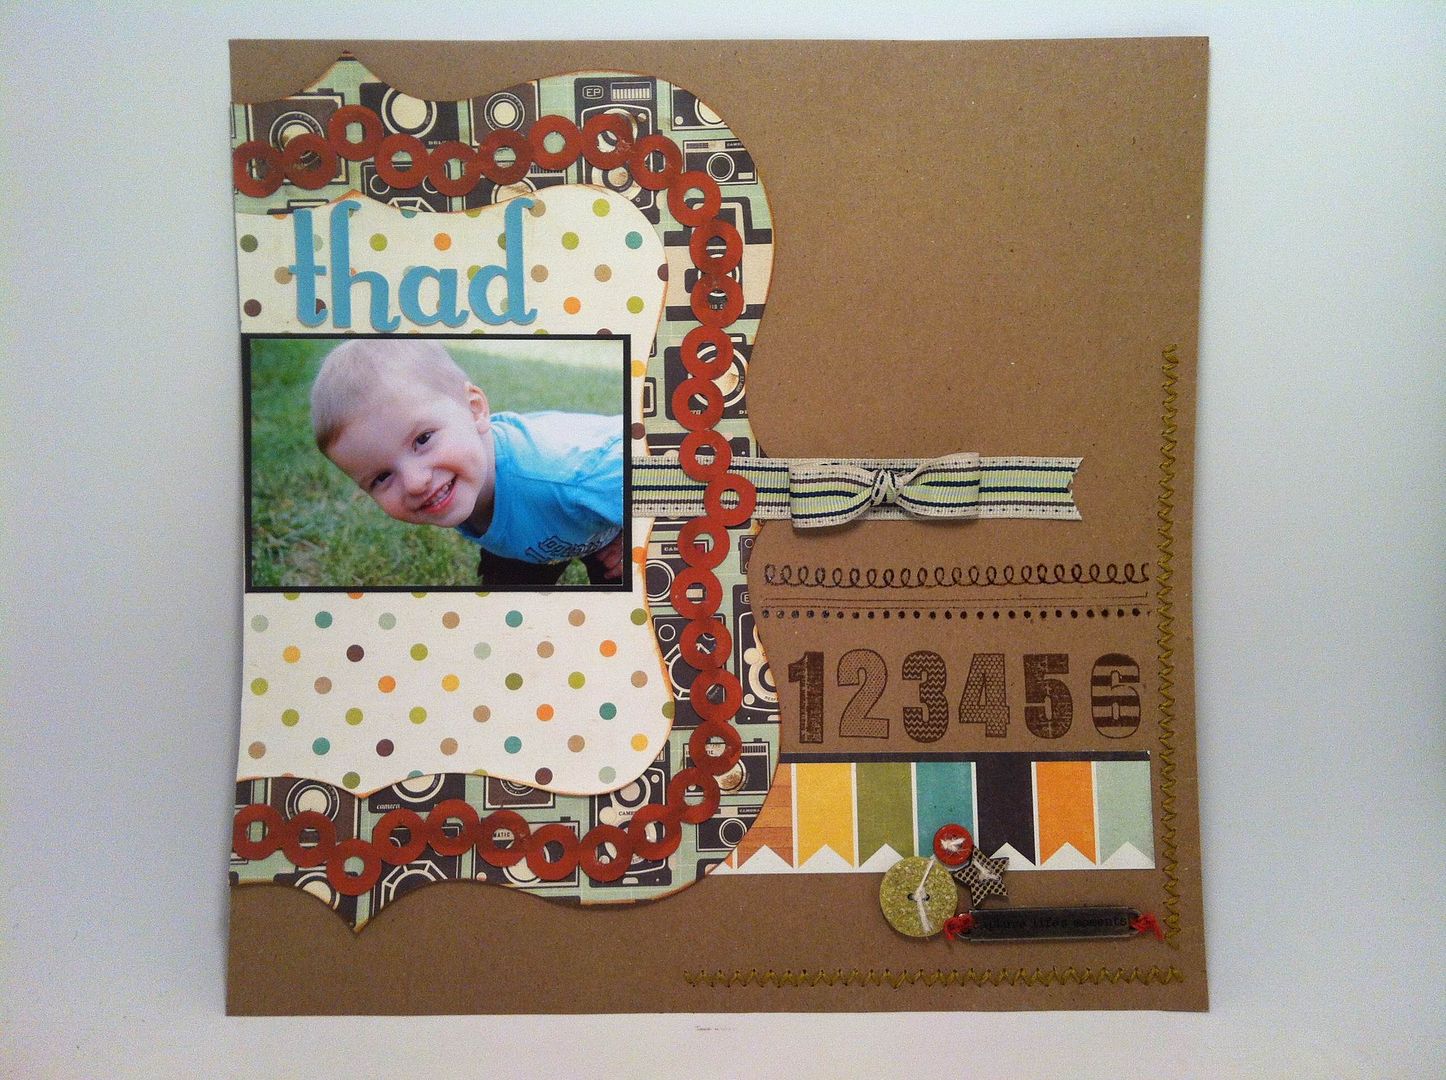
123456 Layout

Hi everyone! This is Elizabeth from 217 Creations.  Stamping on layouts can be so much fun.  I made this layout back in July at a crop I went to with my friends Jessica, Julie, and Sarah.  We had so much fun! I don't panic as mich about layouts or crops as I did when I met up with Pam, Melissa, and Shelia in Dallas in March 2011.
Click to Enlarge
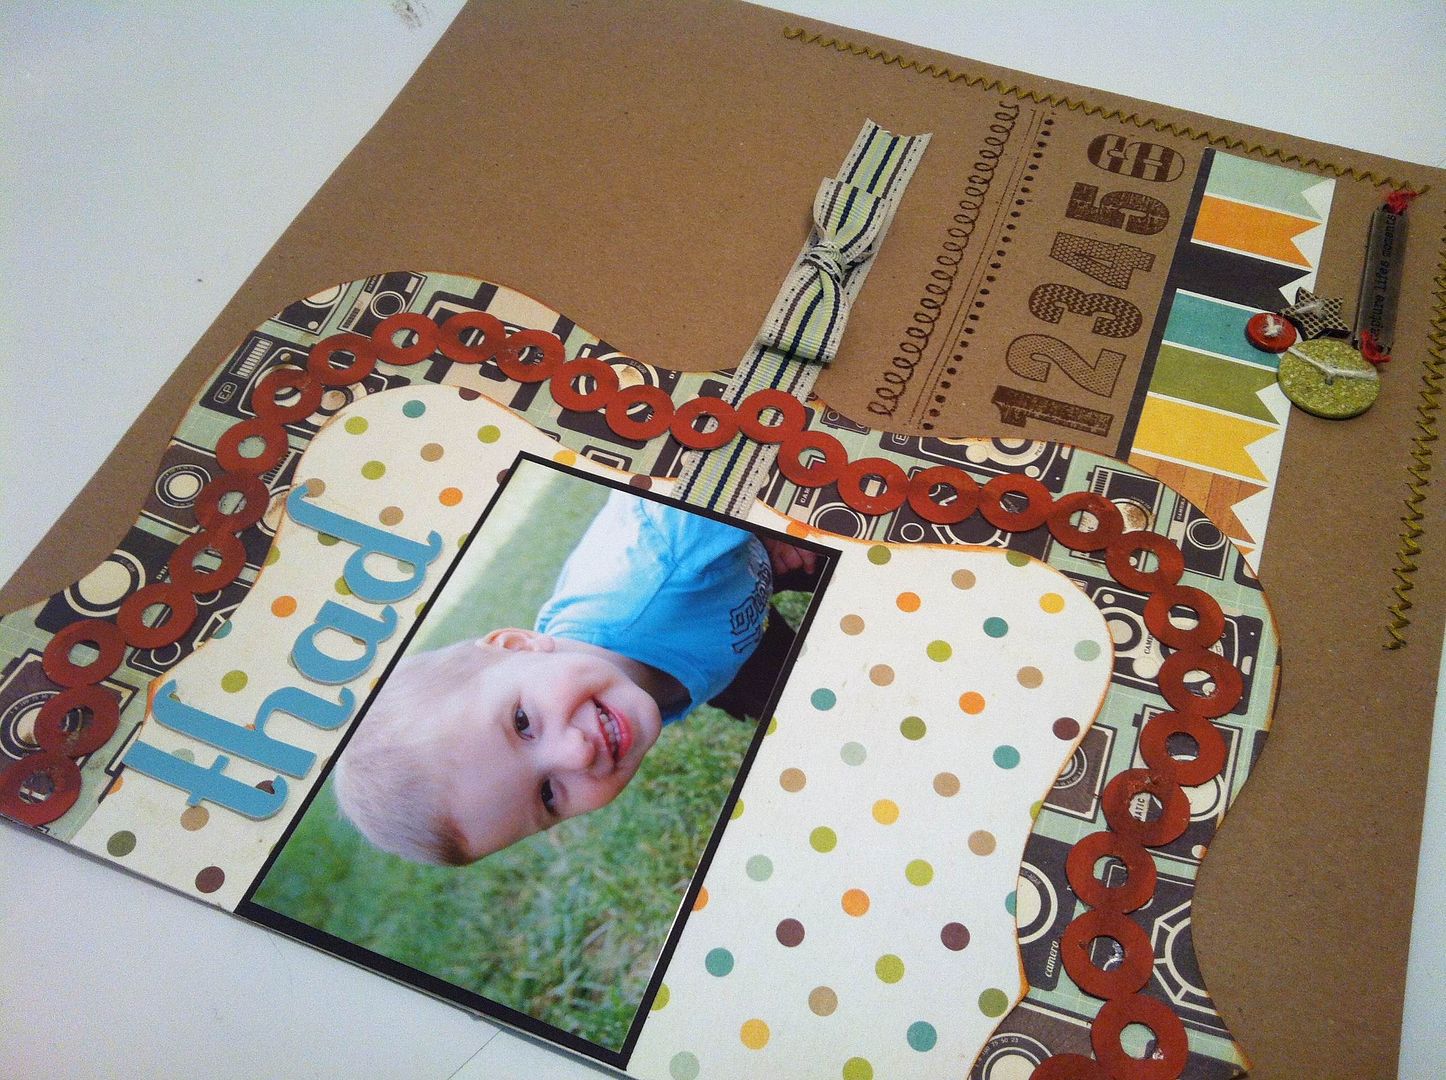
This layout features Echo Park paper and Samantha Walker Silhouette cuts.  I played with the layers of this cut.  I love Samantha Walker designs.  I own most her Spellbinders and I buy as many of her cuts as I can in the Silhouette store. The circle layer is cut from Grungepaper and painted and inked.  I used Thickers for the lettering.  The "123456" stamp are from Pink By Design Half Pints "What's Your Number".  The ribbon is from Fancy Pants and I used 3 Girl Jam bow maker to tie that perfect bow. The stitching on the Kraft cardstock background is done with DMC floss and We R Memory Keepers Sew Easy.  I also added a Tim Holtz nameplate in the corner by the stitching.
Click to Enlarge
I am getting braver with my layouts.  This one features my son Thad.  He is the youngest of the three boys.  He is also a huge ham for the camera. Besides that cute little boy, I love the colors on this layout. The Echo Park combined with the Kraft cardstock is so trendy.
As always thank you for subscribing and following us here at the Bug Bytes and on my personal blog at 217 Creations.

December 5, 2012

Diva Gwendoline

Had to play with this new release digi from digistamps4Joy called Gwendoline
I have long wanted to do a step card but never tried it before so I decided to play with silhouette sd and design one. Of course I will load the the silhouette file for step card template in my blog. You can find it under the tab from main tab menu under silhouette files.

Here is the card using diva Gwen and colored using copics


The card is cut using silhouette SD. The pattern paper is a digi pattern from silhouette store and the butterfly and sentiments and the flowers and swirls and banners are all from silhouette store. You will recognize the small snowflake from yesterday's project. Had to use it again.
I will be entering this in a couple of challenges.
1) http://www.craftdoormagazine.com/2012/12/ttcrd-47-december-4th-10th.html
2) http://thepinkelephantchallenge.blogspot.com/2012/12/the-pink-elephant-challenge-tpe177.html

post signature

Oriental Themed Box for cards.

Hi there everyone, Karon, from Karon's Krafty Korner, here for my monthly visit to The Bug Bytes.

Recently I made a collection of Oriental cards and I am finally getting round to making the gift box to put them in.

Here is my box all finished.


The cards and envelopes need to fit in a 6.5" by 4.5" by 1.5" deep box.

You will need two pieces of card stock; one measuring 9.5" by 7.5" for the base and the other piece 8.5" by 6.5" for the lid.  I wanted the lid to be 1" deep, so that it wasn't the same depth as the base.

I use the Martha Stewart Scoreboard for this project.

Place your paper to the far left on your score board and score the longest side at 1.5" and 8".  Then turn and score the shorter side at 1.5" and 6".


Make tabs by cutting up to the first score line on all four corners, as shown.


Form the base of the box by securing the tabs on the inside flap.


Next for the lid, using the smaller piece of card stock(longer side to top), place you paper on the mark with the arrow (on the left hand side of the score board) (if you don't have a Martha Stewart scoreboard, place your piece of paper 1/16 of inch in from the left edge); score this piece at 1" and 7 5/8" and then turn and score the shorter side at 1" and 5 5/8".


Again make tabs on all four corners and secure these as before.  This is your lid.


Put them together and this is your basic box.  Now the fun part is choosing papers and colours and decorate it how you wish.

As my card set was Oriental themed, I decided to do a complimentary box.

My card stock is from my DCWV stack called The Far East, the same as I used for all the cards.


The top of the box is decorated using the Paper Lace 2 cartridge, for the squares (page 34) cut at 1.5".  The Pagoda cartridge for the temple (page 60) cut at 3".

I did the same embossing technique that I did on my cards, just using the scoreboard to make two lines 1/8" apart, to frame the top and all sides of the box.


I inked all the edges with Tim Holtz Tea Dye Distress ink to finish them off.  The finished box is holding 6 cards and envelopes, but you could probably fit in another 2.

Hope you enjoyed the making of this box.   

Thanks for letting me stop by once again.

Happy crafting everyone.

December 4, 2012

Digistamps4Joy - Challenge #56 - Baby It is Cold Outside

Hello
This is my first design team project for Digistamps4Joy
It's a Recipe Challenge

THEME : 'BABY, IT'S COLD OUTSIDE'
The Recipe is - use 1 image, 2 patterned papers, and three snowflakes.

Challenge runs from 5-18 December 2012

and

As usual there are some goodies up for grabs 

The randomly drawn winner will win THREE images of your choice from the store, and 2 runners up 1 image each.  
Of course, if you use a Digistamps4Joy image, you could win the big prize of $10 of images, and could be chosen as our Guest Designer!

so try your hand and link up your project at Digistamps4Joy

So here is my card for the challenge


and the inside of the card


Ingredients:

Paper : Cardstock from Hobby lobby - Paper studio ; Pattern paper - DCWV - dots, stripes and plaids and 2nd pattern paper is from cosmo cricket - digi paper - circa.
Digi stamp - Digistamps4Joy - cold cutie
Copics for coloring
Acrylic stamps - Pink stamper - winter punnies
Dies used - Spellbinder Oval, Spellbinder oval scallop, Spellbinder Spin from the cut fold and tuck line (center snowflake medallion); Spellbinder label; Memory box swirly tree; Cheery Lynn designs pine leaf
Misc: 2 small snowflakes created using kaleidoscope kreator software - filigree and cut using Silhouette Sd; Ribbon and twine; Rhinestones; ink; Flock and glitter for snow


I colored the cute digi  from Digistamps4Joy using copics and then cut her out leaving a little white around edge and leaving the part near her foot uncut. After cutting the nesting ovals I  laid the image onto the inner oval and cut the bottom in same shape to fit the curved oval. Then I added flock and glitter to create the snow effect. The center medallion snowflake is spellbinder cut fold and tuck die. Love it. The other 2 snowflakes were created using kaleidoscope kreator - filigree. The sentiments are using my pink stamper stamps. the backgroung white swirly tree is cut using memory box die and also glittered.


Do visit http://digistamps4joy-sa.blogspot.com/ and take part in the fun challenge using the recipe - 1 image; 2 pattern paper and 3 snowflakes!


I am entering this in some challenges
1) http://papertakeweekly.blogspot.com/
2) http://nomatterwhichchallenges.blogspot.com/
3) http://dutchdare-cardchallenges.blogspot.com/
4) http://cutecardthursday.blogspot.com/


Thank you for visiting and reading.


post signature

Personalized Note Cards Make Great Christmas Gifts

Good morning. I am so excited to share with you today and I have a great little project that I am making for little Christmas gifts... personalized note cards! This was so much fun that when I finished I actually made a couple of cards for myself too! It was great to spend time in my craft room!


Now wasn't that easy and I got to try heat embossing for the first time! I loved it and I know I will be using that technique alot in the future as I love how finished it looked. Oh I have to tell you as I noticed I never said in the video... Mother is fine, terrible cold and sore throat the Dr. prescribed antibiotics and told her to follow up at her own doctor in a couple of days as precautionary to make sure it didn't go to pneumonia. Boy the calls kept going long into the evening too.

This is how the card looked straight on. Unfortunately the pictures don't show how shimmery it actually is. The cards turned out awesome and I used the same papers for my own... I just couldn't help it! LOL The litttle monogram is from Close To My Heart and is only $2.95.

Another close up. See how the base of the card had little holes cut in it. The papers were from My Mind's Eye Christmas stack and they were so shimmery.
And this is how it looked all wrapped up. I used satin ribbon to wrap it up knowing she could use the ribbon with her own crafting.
Thanks for joining me today. I hope you like today's project. Thanks for your sweet sweet words of encouragement. Your comments inspire me to continue sharing with you.

December 2, 2012

Design Team Digistamps4Joy

I am so glad that I was chosen to be on the design team of http://digistamps4joy-sa.blogspot.com/.
I can't wait to begin. As you know I love coloring and digi images and am so looking forward to  meet the rest of my design team members and start playing with these lovely digi images.


post signature

Ok, whatevs!


First of all, I love my niece! But like some teenagers I know she needs some attitude adjustment once in a while and she knows it   ;)   so I don't feel bad about creating this birthday card for her - she'll shrug off the humor behind it, roll her eyes at me then give me a hug, as she always does anyways.  I know a bit confusing, but then again we're talking about a 15 year old here :).

Hello, fellow bloggers!  This is MelodyR from A Splash Here and There blog.  Thanks Pam and her readers for allowing me to hang out here the first Sunday of every month.   As I mentioned above, this card is a birthday card for my niece. The card was designed using the Silhouette Studio and everything was cut using my Cameo.  The card is roughly 6.25 x 5.25.  The base of the card with the flower cut out is by Jamie Koay, purchased through the Silhouette Store. 

After sizing the card base to my liking, I imported a png image (digital stamp) by Scrapper's Delights (she's already colored in, so a big time saver for me!) onto the Silhouette Studio then sized it to fit in the front of the card base.  Png images don't have cut lines so I used the trace feature of the Silhouette Studio to create a cut line around the image so that my Cameo can do the cutting for me.

png images have clear backgrounds, making them
blend with whatever background you choose to put
them on top of

using the trace feaure allows me to create a cut line
around the png image I want to use
 
here's a screen shot of how I planned this card on the Silhouette Studio,
including the envelope
 
I don't like to waste paper so here's a pic of the girl image,
the sentiment and the patterned matt after I printed them on my printer.
Notice the cut lines will not show here, but the registration marks on
the three corners of the page will guide the Cameo where to cut.
 
And here are some closeups of the finished card:
 
the image is foam mounted

I inserted a vellum panel just behind the front panel of the card.  
The top banner pennant was embossed with Plum Blossoms CB folder.
The plumeria (a png image) is part of a digital scrapbook collection
from Scrapgirls.  Like my little humor jab at her?  Like I've said, she'll
shrug it off LOL! 

I did some stitching too.

  
Thanks again for having me over, Pam!  Have a wonderful rest of the weekend!
 
~MelodyR  ;)


December 1, 2012

Winter Wonderland Packages Layout

Hello!  Denine, of PumpkinSpice, here with a little Bugbytes inspiration. Thank you Pam.

In my blog surfing, I came across a mention of using card kits for layouts.
So this got me thinking... since the SPS kits are mainly card sized materials, could I (not a layout type of gal) put together a layout with it.  And guess what... I did and it was really easy to put together.

The only piece that is not part of the kit is the 12 x 12 base, oh yeah, and ink and adhesive are from my stash.

The top left is a pocket with a journal card the pulls out and opens up to a 2 x 4 writing area.  The 'polka dots' mat is for a photo.  This came together really fast and didn't even make a dent in the kit.


I am having too much fun with Stickles and Glossy Accents lately. :)

Recipe:
Adhesive -
Ink - Tim Holtz - Frayed Burlap
 
Thank you for stopping in to see my little craft today.  I hope you enjoyed.
Have a wonderful weekend.
 
Hugs,
Denine