

November 13, 2012
Happy Deepavalli
Wish you all a very Happy Deepavali Today is the festival of lights. "Deepa" means light and "Bali" means an array or row . It signifies the good conquering evil! People wake up early have an oil head bath and wear new clothes and take the blessings of elders and gods. Lots of savories - both salty and sweet. And of course firecrackers! ! What fun! Then we go out and exchange sweets with relatives and of course show off our pretty new dresses! In the evening rows of mud lamps - deepas are lit.A beautiful sight to behold. WISHING YOU ALL AVERY HAPPY DEEPAVALI ONCE MORE

Christmas card
Today I'm sharing with you a Christmas card I made over the weekend.
I recently went to a craft show and I saw these stamps and had to buy them. These figures also come in Santa costumes and elf costumes. Of course I had to have all three sets. They are by Stamposaurus a U.k company.
Here's my card
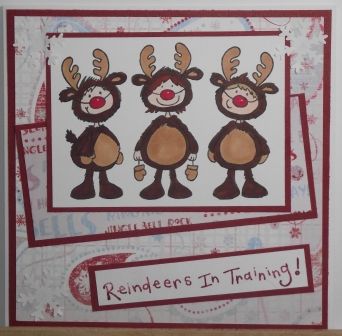
The sentiment comes with the set too. Cute isn't it. I used coordination card stock and the DCWV glitter stack. As you can see I make a lot of cards with straight edges, although I am starting to introduce circles as I've recently got the circle nesties. The next on my list are the oval nesties.
Thanks Pam for having me to day.
Kelly x
November 12, 2012
Tennis Anyone?

I am so excited to be here at The Bug Bytes today!!
This is Lori from ScrappinMyStressAway and I have a son who is a senior in high school I am trying to get his album caught up for his graduation party. Tennis season just ended, and I wanted to showcase his letter certificate.

I started with my Gypsy of course! I put a square from George on my mat. I unlinked the chain between the width and height and selected Real Size. The shapes on George are not true to size - I learned this years ago the hard way!!
The certificate measures 8.5 x 11, so I made my rectangle 8.75 x 11.25 to give me an 1/8 inch border.
I used Varsity Letter for my font and used the shift to put the shadow (bottom) layer on my mat and sized the letters and numbers to 1.15 inches. I centered them on the top and bottom of the rectangle and welded them on.

I cut my design out of black cardstock.

I used the toss-away piece as a back to my tennis ball paper. The paper was a little flimsy.
I trimmed off 1/4 inch off of two sides (a top and a side if you will) to make the tennis ball paper 11.75 x 11.75.
I adhered the tennis ball paper to the black toss-away piece to create the layered look.

I went back to my Gypsy and cut out the inside cuts of TENNIS and 2012 2013 (also sized to 1.15 inches) in a bright yellow cardstock.

I adhered the certificate and the letters and numbers to the page. I used glue dots to add his chevron in the event that he wants a letterman jacket.
This could be easily adapted to any sport or activity, as well as other certificates (honor roll, national honor society, recognition from a teacher, etc).
I copied and pasted this image to another layer on my Gypsy and removed TENNIS and added BOWLING as he is at his first tournament right now. I am getting ready ahead of time!!
I hope I inspired you to add your big items to your scrapbooks in a fun way!!
November 11, 2012
Christmas Gatefold Card
Hi Crafty friends :)
Adele here today to share my project with all of you and over on my own blog.
I designed a Gatefold Christmas Card in Studio for today's project, I'll share the file at the end of this post if you would like to download it :)
Sorry for the poor picture quality, mirri card (shiny foil) is not easy to capture well.

I will show you what the file contains, then show how to put it together...so here is the studio screen shot

I cut this on 12x12 gold mirri card stock, the reverse of which is plain white (hence the reverse phrase "Happy Christmas), you'll see why in a minute :)
First you need to join the two door section's together,

Then you need to attach these to the back of the card


When both sides are attached you then add the phrase to the inside of the back piece, I glittered my piece (the reverse of the phrase as mentioned above)

Now I have kept this file simple but it can be fancied up any way you want.
I have made others that have scroll work and lattice ovals etc, so you can adapt this file easily :)
You can get the free file I made HERE
Thanks for stopping by today
Thanks Pam for having me again this month :)
Thanks Pam for having me again this month :)
Happy Crafting
Hugs
Adele
Adele
November 9, 2012
Debut for the Bug Bytes - Fall Wreath


Hi Everyone,
This is Lisa from Lisa's Craft Room and I must say, I was so very honored to be asked to design for Pam. Thank you so much for giving me this opportunity. I also design for Sheila at She's A Sassy Lady. I would love to start to find the time to post more often and not only when it's my turn to do a project. It's hard finding the time between working and taking care of the house and everyone, but I'm sure we all have to do that right? We also have to find the time to do what we love. I hope you like my projects and that I make you proud to have me as a part of your team.
I found these cute grapevine wreaths at Target for $1.00. I decided I would make one for Fall. I bought 2 more and will probably make one a Christmas theme and give it to my mother for her home. I'm not sure what I will do with the other one yet, maybe something for Valentine's Day.
I covered the wreath with Fall Ribbon and made a loop to hang it. I used the die cut leaf from Piles of Smiles from Emma at My Creative Time. I cut out several in different colors and inked the edges with brown ink. I used my hot glue gun to adhere them around the wreath.
I think it makes a cute decoration and I can use it for years to come.
Thank you for taking the time to stop by. Thanks again Pam for inviting me to be a part of your team. :)
November 7, 2012
A Gift Box for cards.
Hi everyone, Karon here from Karon's Krafty Korner for my monthly little visit. On my blog I have been doing sets of 6 cards and making gift boxes to store them. Here is the latest.
Today I am using a Gina K Designs at Stamp TV, design. The links to the two part tutorial are as follows Memory Keeper part 1 and Memory part 2.
However, I needed to make the box a little deeper, so had to rework the measurements. The original box is 0.5" deep, mine is 1" deep to take the extra thickness of the 6 cards and envelopes.
Here is my finished box.

For my belly band front I did several layers and added some ribbon. For the panels I used the Art Philosophy cartridge, Square 4 (page 53) cut at 4" by 3" and 3.5" by 2.5". The font was cut at 0.75".
So, I guess you would like to know how to make it. For my deeper box you will need to have a 12" by 10.5" piece of card stock. Keep the piece you cut off - to use later.
Along the 10.5" side you will score at 1", 2", 8.5" and 9.5"".

Next you will score along the 12" side at 3.25", 4.25", 8.75" and 9.75". This way you will end up with a deeper box but still have a nice size over lap at the front.

Now to cut out the following areas so that your flat box looks like this. And then cut into the 8.75" score line to form a tab.

It is best to decorate, as Gina suggests, before you assemble your box - placing your decorated panels before you do this makes it easier.
At this point you could use a corner punch to tidy up your corners - as below.

Your panels are going to measure:
Middle panel - 6.25" by 4.25" , for the second layer I did 5.75" by 3.75".
Top panel (the larger of the two edge panels) - 6.25" by 3", second layer 5.75" by 2.5"
Bottom panel - 6.25" by 2", second layer 5.75" by 1.5"
I decided that as I had a deeper box I would decorate the top fold of the box, this was 6.25" by 0.75" and then the second layer was 5.75" by just 0.25" and the side folds which were 4.25" by 0.75" and 3.75" by 0.25" to keep in proportion with the rest of the panels.


This box will hold 6 cards and envelopes. These envelopes were 6.25" by 4.25".

Today I am using a Gina K Designs at Stamp TV, design. The links to the two part tutorial are as follows Memory Keeper part 1 and Memory part 2.
However, I needed to make the box a little deeper, so had to rework the measurements. The original box is 0.5" deep, mine is 1" deep to take the extra thickness of the 6 cards and envelopes.
Here is my finished box.

For my belly band front I did several layers and added some ribbon. For the panels I used the Art Philosophy cartridge, Square 4 (page 53) cut at 4" by 3" and 3.5" by 2.5". The font was cut at 0.75".
So, I guess you would like to know how to make it. For my deeper box you will need to have a 12" by 10.5" piece of card stock. Keep the piece you cut off - to use later.
Along the 10.5" side you will score at 1", 2", 8.5" and 9.5"".


Now to cut out the following areas so that your flat box looks like this. And then cut into the 8.75" score line to form a tab.

It is best to decorate, as Gina suggests, before you assemble your box - placing your decorated panels before you do this makes it easier.
At this point you could use a corner punch to tidy up your corners - as below.

Your panels are going to measure:
Middle panel - 6.25" by 4.25" , for the second layer I did 5.75" by 3.75".
Top panel (the larger of the two edge panels) - 6.25" by 3", second layer 5.75" by 2.5"
Bottom panel - 6.25" by 2", second layer 5.75" by 1.5"
I decided that as I had a deeper box I would decorate the top fold of the box, this was 6.25" by 0.75" and then the second layer was 5.75" by just 0.25" and the side folds which were 4.25" by 0.75" and 3.75" by 0.25" to keep in proportion with the rest of the panels.

Now place some tape ready to make up the box - this is where the tape is needed.

Pull up the small tabs first and secure on the inside of the box.

Bottom front piece secure to inside flaps.

That is basically the box done - all that is left is to decorate it how you wish.
You can always refer to the Stamp TV video - if there are any problems with following my photos, as other than the measurements, putting it together is the same.
To secure the box - I decided to make a belly band. You can use the 1.5" by 12" piece that you cut off the original 12" by 12" piece of card stock. You score this at 2.75", 3.75", 8.25" and 9.25" marks and it will wrap quite easily around the box and secure. Then decorate the band.

My box to the side.

This box will hold 6 cards and envelopes. These envelopes were 6.25" by 4.25".

Thanks for visiting the Bug Bytes today and thank you Pam for letting me visit again this month.
Happy crafting.
November 6, 2012
Yeah! what a great weekend!
Had a wonderful weekend at the Copic certification class. Our instructor was Colleen Schaan. What a sweet sweet person. Loved her instructions. Her joy in the art came through. And got her autograph on my copy of her books :)
What a great and interesting bunch of colleagues ! We had a fun time! Hopefully a lot of us will keep in touch.
What a great and interesting bunch of colleagues ! We had a fun time! Hopefully a lot of us will keep in touch.

HAPPY BIRTHDAY PAM

Just a quick little note from all of us to say HAPPY BIRTHDAY to a Sweet - Sweet Lady!
My Portland Maine Pages

As you know things have been very hectic in my life as of late and I just want to thank you for all the wonderful letters, notes and prayers in our behalf. I am thankful for each and everyone of you. I also want to thank each and everyone of the Sassy Designers for being there and always sharing a wonderful post with you... they are THE BEST!
For this post I used the Close To My Heart Studio J digital page program and this time made a video showing you how easy it is to design the pages no matter which option you choose from the site. My video will show both options. Either way it will take you around 15 minutes to make 2 pages. And with my hectic life as of late this is a wonderful option.


I sure hope you liked my pages today. It was so nice to spend a little time with you. Thanks for joining me today and tank you for your sweet sweet words of encouragement. Your comments continue to inspire me. Have a blessed day!
Subscribe to:
Posts
(
Atom
)